
🎉 Introduction
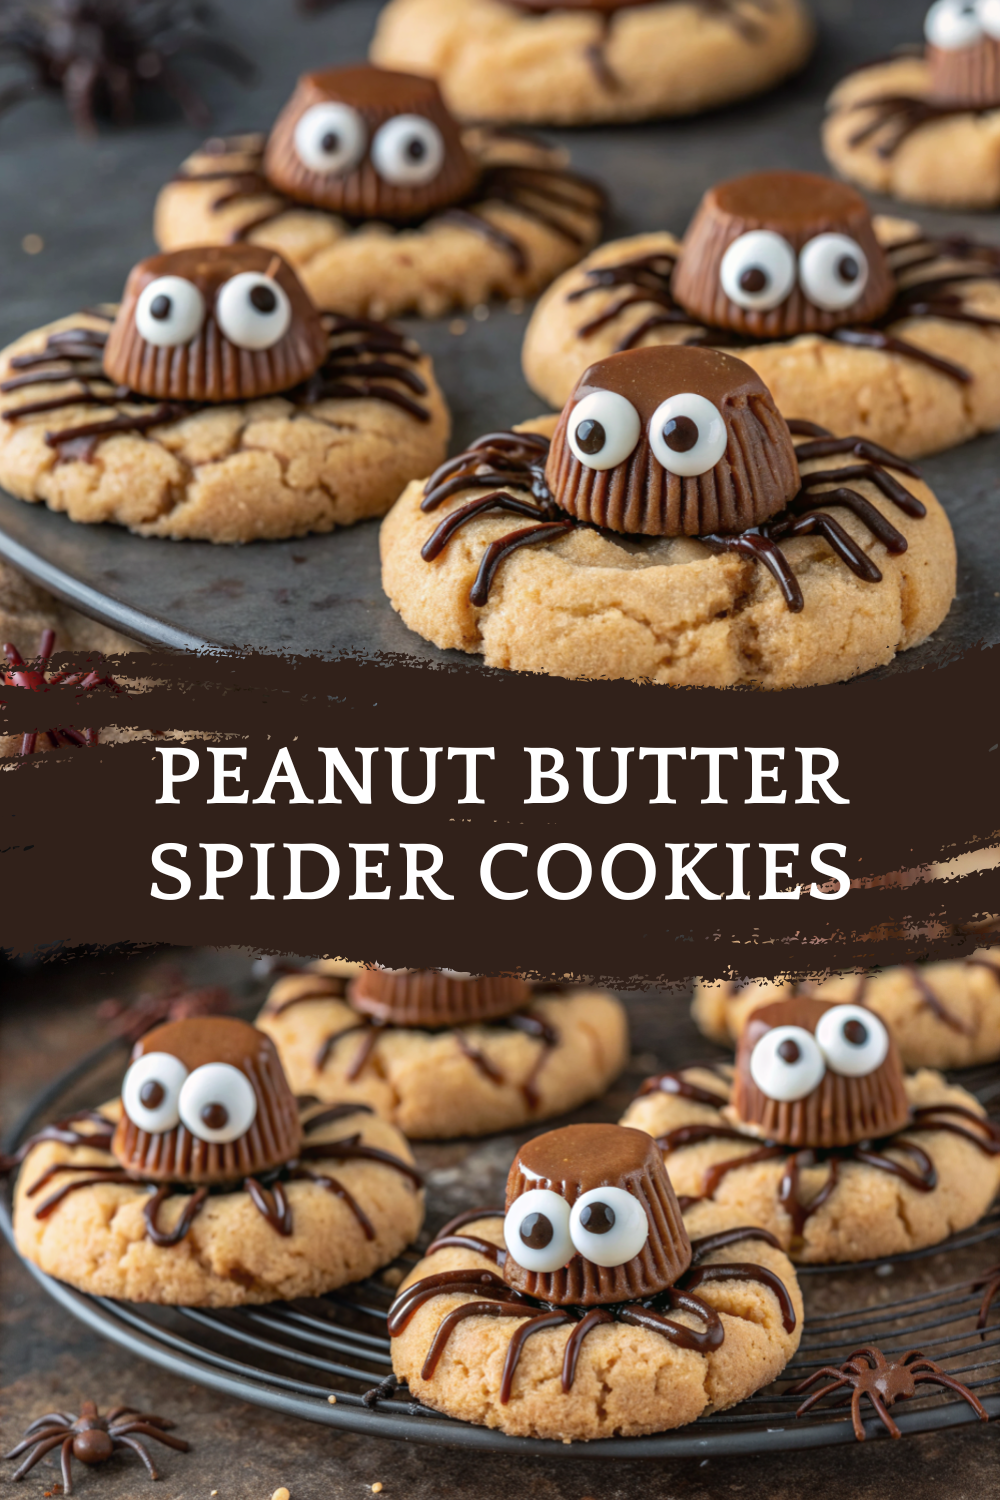
Halloween is the perfect excuse to get creative in the kitchen, and these Peanut Butter Spider Cookies are a creepy-cute way to bring fun to your dessert table. With soft, chewy peanut butter cookies as the base and spooky spider decorations made with chocolate candies and candy eyes, these cookies are as festive as they are delicious.
Kids love helping decorate the “spiders,” and adults can’t resist the combination of peanut butter and chocolate. Whether you’re baking for a Halloween party, trick-or-treat gathering, or just a family movie night, these spider cookies will quickly become a holiday favorite.
🧰 Equipment Needed
- Mixing bowls
- Hand or stand mixer
- Measuring cups and spoons
- Baking sheets
- Parchment paper or silicone mats
- Wire cooling rack
- Piping bag or zip-top bag (for chocolate legs)
🛒 Ingredients
- ½ cup salted butter, softened
- ½ cup creamy peanut butter
- ½ cup brown sugar, packed
- ¾ cup granulated sugar
- 1 large egg
- 1 teaspoon vanilla extract
- 1 ½ cups all-purpose flour
- ½ teaspoon baking soda
- ½ teaspoon baking powder
- 1 cup semi-sweet chocolate chips (melted, for spider legs)
- 22–24 round chocolate candies (Whoppers, Maltesers, or chocolate truffles)
- Candy eyes (or mini chocolate chips for eyes)
👩🍳 Directions
Step 1: Preheat your oven to 350°F (175°C) and line baking sheets with parchment paper.
Step 2: In a large mixing bowl, cream together the butter, peanut butter, brown sugar, and granulated sugar until fluffy.
Step 3: Beat in the egg and vanilla extract until smooth.
Step 4: In another bowl, whisk together flour, baking soda, and baking powder. Gradually add the dry ingredients to the wet ingredients, mixing until a dough forms.
Step 5: Roll the dough into 1-inch balls and place them 2 inches apart on the baking sheets.
Step 6: Bake for 8–10 minutes, until edges are set but centers are still soft.
Step 7: Remove cookies from the oven and immediately press a round chocolate candy into the center of each one. Transfer cookies to a wire rack to cool.
Step 8: Melt chocolate chips in a microwave-safe bowl in 20-second intervals until smooth. Transfer to a piping bag or zip-top bag with the corner snipped.
Step 9: Pipe four chocolate legs on each side of the candy to create spider legs.
Step 10: Place two candy eyes on each chocolate candy, using a dab of melted chocolate as glue. Let set before serving.
🍽️ Servings & Timing
- Servings: 22–24 cookies
- Prep time: 20 minutes
- Cook time: 10 minutes
- Decorating time: 15 minutes
- Total time: 45 minutes
🧊 Storage & Reheating
- Room temperature: Store in an airtight container for up to 5 days.
- Refrigerator: Store up to 1 week (cookies may firm slightly).
- Freezer: Freeze plain cookies up to 2 months. Decorate after thawing.
- Reheating: Microwave for 10 seconds for a soft, warm cookie.
🥄 Variations
- Nut-free: Use sunflower seed butter for a safe alternative.
- Double chocolate spiders: Use chocolate cookie dough instead of peanut butter.
- Mini spiders: Use mini chocolate balls for bite-sized cookies.
- Colorful spiders: Swap candy eyes with orange, green, or red decorating gel.
- Spider families: Place one big chocolate candy and a smaller one next to it for a mama-and-baby spider look.
❓ 10 FAQs
- Can I use crunchy peanut butter?
– Yes, but creamy gives smoother cookies. - What if I don’t have candy eyes?
– Use mini chocolate chips or icing dots. - Do I need to chill the dough?
– Not required, but chilling helps keep them thicker. - Can I use store-bought cookies instead?
– Yes, just decorate them the same way. - Do kids enjoy making these?
– Definitely! Decorating spiders is a fun Halloween activity. - Can I use truffles instead of Whoppers?
– Yes, round chocolates like Lindt truffles work great. - How do I stop cookies from spreading too much?
– Don’t over-soften butter and avoid over-mixing. - Can I make them ahead of time?
– Yes, bake cookies and decorate the next day. - Are these freezer-friendly after decorating?
– Best to freeze plain cookies and add decorations later. - What dipping sauces pair with them?
– They’re great alone, but chocolate or peanut butter drizzle makes them extra indulgent.
🏁 Conclusion
These Peanut Butter Spider Cookies are the ultimate Halloween cookie — chewy, peanut buttery, and decked out with spooky chocolate spiders. Easy enough for kids to help decorate and delicious enough for adults to enjoy, they’re guaranteed to creep their way into your Halloween traditions. Bake a batch, share with friends, and watch them disappear faster than you can say “trick or treat!”
Peanut Butter Spider Cookies | Creepy-Cute Halloween Treat
Kids love helping decorate the “spiders,” and adults can’t resist the combination of peanut butter and chocolate. Whether you’re baking for a Halloween party, trick-or-treat gathering, or just a family movie night, these spider cookies will quickly become a holiday favorite.
Ingredients
✨ Kitchen Essentials You’ll Love
Quick picks I trust for better results, faster prep, and easier cleanup.
-
🍳
Lodge Seasoned Cast Iron Skillet
-
⚡
Instant Pot Duo Plus 9-in-1 Electric
-
🔥
CHEFMAN Digital Air Fryer XL 10L
Disclosure: As an Amazon Associate, I earn from qualifying purchases at no extra cost to you.
Equipment
Method
Notes
Room temperature: Store in an airtight container for up to 5 days.
Refrigerator: Store up to 1 week (cookies may firm slightly).
Freezer: Freeze plain cookies up to 2 months. Decorate after thawing.
Reheating: Microwave for 10 seconds for a soft, warm cookie.
🥄 Variations
Nut-free: Use sunflower seed butter for a safe alternative.
Double chocolate spiders: Use chocolate cookie dough instead of peanut butter.
Mini spiders: Use mini chocolate balls for bite-sized cookies.
Colorful spiders: Swap candy eyes with orange, green, or red decorating gel.
Spider families: Place one big chocolate candy and a smaller one next to it for a mama-and-baby spider look.
❓ 10 FAQs
Can I use crunchy peanut butter?
– Yes, but creamy gives smoother cookies.
What if I don’t have candy eyes?
– Use mini chocolate chips or icing dots.
Do I need to chill the dough?
– Not required, but chilling helps keep them thicker.
Can I use store-bought cookies instead?
– Yes, just decorate them the same way.
Do kids enjoy making these?
– Definitely! Decorating spiders is a fun Halloween activity.
Can I use truffles instead of Whoppers?
– Yes, round chocolates like Lindt truffles work great.
How do I stop cookies from spreading too much?
– Don’t over-soften butter and avoid over-mixing.
Can I make them ahead of time?
– Yes, bake cookies and decorate the next day.
Are these freezer-friendly after decorating?
– Best to freeze plain cookies and add decorations later.
What dipping sauces pair with them?
– They’re great alone, but chocolate or peanut butter drizzle makes them extra indulgent.
🏁 Conclusion
These Peanut Butter Spider Cookies are the ultimate Halloween cookie — chewy, peanut buttery, and decked out with spooky chocolate spiders. Easy enough for kids to help decorate and delicious enough for adults to enjoy, they’re guaranteed to creep their way into your Halloween traditions. Bake a batch, share with friends, and watch them disappear faster than you can say “trick or treat!”


Leave a Reply