🎉 Introduction
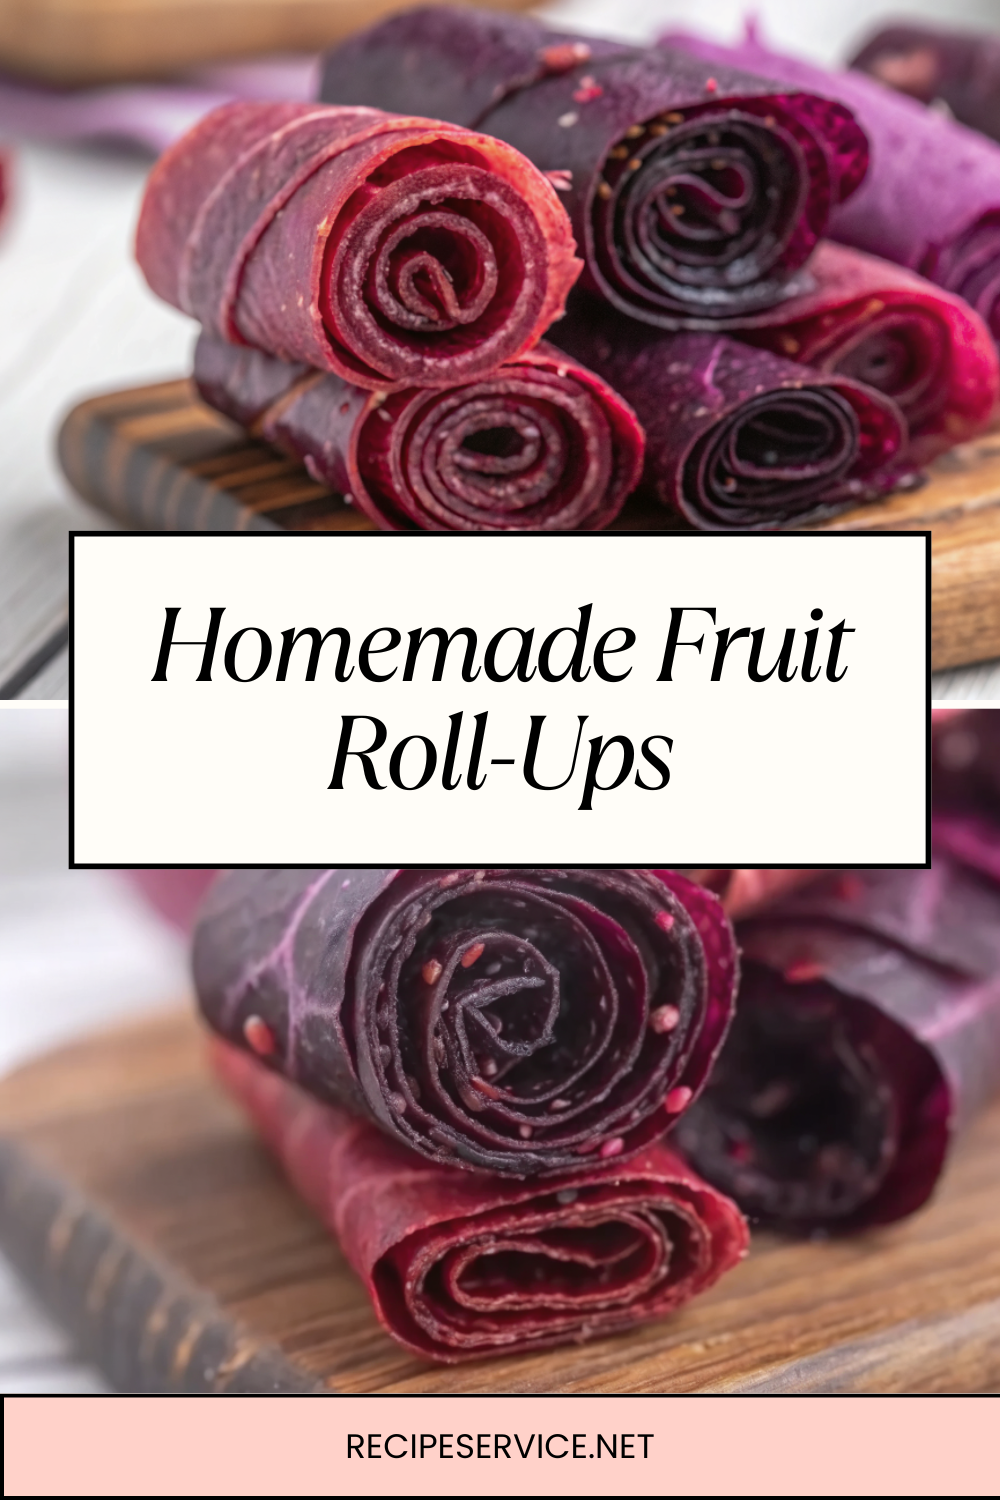
Forget store-bought — making Homemade Fruit Roll-Ups is surprisingly simple and incredibly rewarding. Using just fresh berries, honey, and a touch of lemon juice, you can create a naturally sweet, chewy snack without artificial flavors, dyes, or preservatives.
These roll-ups are perfect for lunchboxes, road trips, or just as a healthier sweet treat at home. Plus, you can customize the flavors based on your favorite fruits. Once you try these, you’ll never want to go back to packaged fruit snacks.
🧰 Equipment Needed
- Blender or food processor
- Saucepan
- Baking sheet
- Parchment paper or silicone baking mat
- Offset spatula or spoon
- Oven or dehydrator
- Sharp knife or scissors
🛒 Ingredients
Fruits & Vegetables:
- 5 cups berries (strawberries, blueberries, raspberries, or a mix)
Condiments:
- ¼ cup honey (adjust to taste)
- 2 tbsp lemon juice (freshly squeezed)
👩🍳 Directions
Step 1: Prepare the Fruit Puree
- Wash and hull (if needed) the berries.
- Add berries, honey, and lemon juice to a blender or food processor.
- Blend until smooth.
Step 2: Cook Down the Mixture
- Pour the puree into a saucepan.
- Cook over medium heat, stirring often, until slightly thickened — about 10–15 minutes.
- This step intensifies the flavor and helps the roll-ups set better.
Step 3: Spread on Baking Sheet
- Preheat oven to 170°F (75°C) or the lowest setting.
- Line a baking sheet with parchment paper or a silicone mat.
- Pour the puree onto the sheet and spread evenly about ⅛-inch thick.
Step 4: Dry the Roll-Ups
Oven Method:
- Bake for 4–6 hours, or until the surface is dry but still slightly tacky.
Dehydrator Method:
- Spread puree on dehydrator trays and dry at 135°F (57°C) for 6–8 hours.
Step 5: Cut & Roll
- Once cool, peel the fruit sheet from the parchment.
- Cut into strips using a sharp knife or scissors.
- Roll each strip with the parchment still attached to prevent sticking.
🍽️ Servings & Timing
- Servings: About 12 strips
- Prep Time: 10 minutes
- Cook/Dry Time: 4–6 hours
- Total Time: 4–6 hours, 10 minutes
🧊 Storage & Reheating
- Room Temperature: Store in an airtight container for up to 1 week.
- Refrigerator: Keeps for up to 1 month.
- Freezer: Store for up to 3 months — let thaw before eating.
🥄 Variations
- Mixed Fruit: Combine berries with mango, peach, or pineapple.
- Spiced: Add a pinch of cinnamon or ginger for warmth.
- Tropical: Blend in shredded coconut before drying.
- Sugar-Free: Skip honey if berries are naturally sweet.
❓ 10 FAQs
1. Can I use frozen berries?
Yes — thaw them first and drain excess liquid.
2. Can I make these without honey?
Yes — use maple syrup or skip sweetener entirely.
3. Why is my roll-up cracking?
It was dried too long; next time, check for flexibility earlier.
4. Can I use a microwave?
Not for drying — it won’t work properly.
5. How do I prevent sticking?
Keep parchment on until you eat them or use silicone mats.
6. Can I use citrus other than lemon?
Yes — lime or orange juice works for a flavor twist.
7. Do I have to cook the puree first?
It’s optional, but cooking improves texture and flavor.
8. Can I make them thicker?
Yes — just increase drying time.
9. Are these vegan?
Yes — if you skip honey or use maple syrup.
10. Can kids help make these?
Definitely — they can help blend and cut the strips.
🏁 Conclusion
Homemade Fruit Roll-Ups are proof that the best snacks come from your own kitchen. With simple ingredients and a little patience, you’ll have a naturally sweet, chewy treat that’s customizable, healthy, and fun to make.

Homemade Fruit Roll-Ups – Sweet, Chewy & Naturally Delicious
These roll-ups are perfect for lunchboxes, road trips, or just as a healthier sweet treat at home. Plus, you can customize the flavors based on your favorite fruits. Once you try these, you’ll never want to go back to packaged fruit snacks.
Ingredients
✨ Kitchen Essentials You’ll Love
Quick picks I trust for better results, faster prep, and easier cleanup.
-
🍳
Lodge Seasoned Cast Iron Skillet
-
⚡
Instant Pot Duo Plus 9-in-1 Electric
-
🔥
CHEFMAN Digital Air Fryer XL 10L
Disclosure: As an Amazon Associate, I earn from qualifying purchases at no extra cost to you.
Equipment
Method
-
Wash and hull (if needed) the berries.
-
Add berries, honey, and lemon juice to a blender or food processor.
-
Blend until smooth.
-
Pour the puree into a saucepan.
-
Cook over medium heat, stirring often, until slightly thickened — about 10–15 minutes.
-
This step intensifies the flavor and helps the roll-ups set better.
-
Preheat oven to 170°F (75°C) or the lowest setting.
-
Line a baking sheet with parchment paper or a silicone mat.
-
Pour the puree onto the sheet and spread evenly about ⅛-inch thick.
-
Oven Method:
-
Bake for 4–6 hours, or until the surface is dry but still slightly tacky.
-
Dehydrator Method:
-
Spread puree on dehydrator trays and dry at 135°F (57°C) for 6–8 hours.
-
Once cool, peel the fruit sheet from the parchment.
-
Cut into strips using a sharp knife or scissors.
-
Roll each strip with the parchment still attached to prevent sticking.
Notes
Room Temperature: Store in an airtight container for up to 1 week.
Refrigerator: Keeps for up to 1 month.
Freezer: Store for up to 3 months — let thaw before eating.
🥄 Variations
Mixed Fruit: Combine berries with mango, peach, or pineapple.
Spiced: Add a pinch of cinnamon or ginger for warmth.
Tropical: Blend in shredded coconut before drying.
Sugar-Free: Skip honey if berries are naturally sweet.
❓ 10 FAQs
1. Can I use frozen berries?
Yes — thaw them first and drain excess liquid.
2. Can I make these without honey?
Yes — use maple syrup or skip sweetener entirely.
3. Why is my roll-up cracking?
It was dried too long; next time, check for flexibility earlier.
4. Can I use a microwave?
Not for drying — it won’t work properly.
5. How do I prevent sticking?
Keep parchment on until you eat them or use silicone mats.
6. Can I use citrus other than lemon?
Yes — lime or orange juice works for a flavor twist.
7. Do I have to cook the puree first?
It’s optional, but cooking improves texture and flavor.
8. Can I make them thicker?
Yes — just increase drying time.
9. Are these vegan?
Yes — if you skip honey or use maple syrup.
10. Can kids help make these?
Definitely — they can help blend and cut the strips.
🏁 Conclusion
Homemade Fruit Roll-Ups are proof that the best snacks come from your own kitchen. With simple ingredients and a little patience, you’ll have a naturally sweet, chewy treat that’s customizable, healthy, and fun to make.

Leave a Reply